Building a web extension with Vue at speed of light

What is a web extension?
TIP — Chrome's definition Extensions are small software programs that customize the browsing experience. They enable users to tailor Chrome functionality and behavior to individual needs or preferences. They are built on web technologies such as HTML, JavaScript, and CSS.
At Chrome's official document you can see more info on what they are and what you can do with them.
Generating our Web Extension
We are going to use the great tool vue-web-extension by @HugoAlliaume. We only need to have the Vue CLI installed. If you have always used Vue through the CDN distribution, then you need to install it by running:
$ npm install -g @vue/cli
# OR
$ yarn global add @vue/cli
Please check Vue CLI installation guide for more info.
Once you have successfully installed Vue CLI, please execute:
$ vue init kocal/vue-web-extension my-extension
The previous command will drive you through the creation of our web extension. In the process, you will be asked a few questions such as project name, libraries we want to use, license, etc. They are there to make your life easier and reduce the boilerplate in the initial version of your web extension. So don't worry about it!
TIP — Keep it simply If you are not 100% sure about adding a dependency or not, I recommend keeping it simple. You can always opt to add it manually later.
For simplicity, and in the context of this tutorial I set the following values:
? Project name my-extension
? Project description A Vue.js web extension
? Author Streaver
? License MIT
? Use Mozilla's web-extension polyfill? (https://github.com/mozilla/webextension-polyfill) Yes
? Provide an options page? (https://developer.chrome.com/extensions/options) No
? Install vue-router? No
? Install vuex? No
? Install axios? No
? Install ESLint? No
? Install Prettier? No
? Automatically install dependencies? npm
Now that we have the web extension skeleton, it's time to build the extension. Simply run:
$ cd my-extension
$ npm run build:dev
At this point, you should have compiled the extension successfully (in the terminal should be many indicators of that, such as no errors displayed or Built at: MM/DD/YYYY message). If that's the case, you should be able to see a new folder dist in the root path. It contains the compiled version of my-extension. Yay! 🎊
Let's run our extension locally
Google Chrome
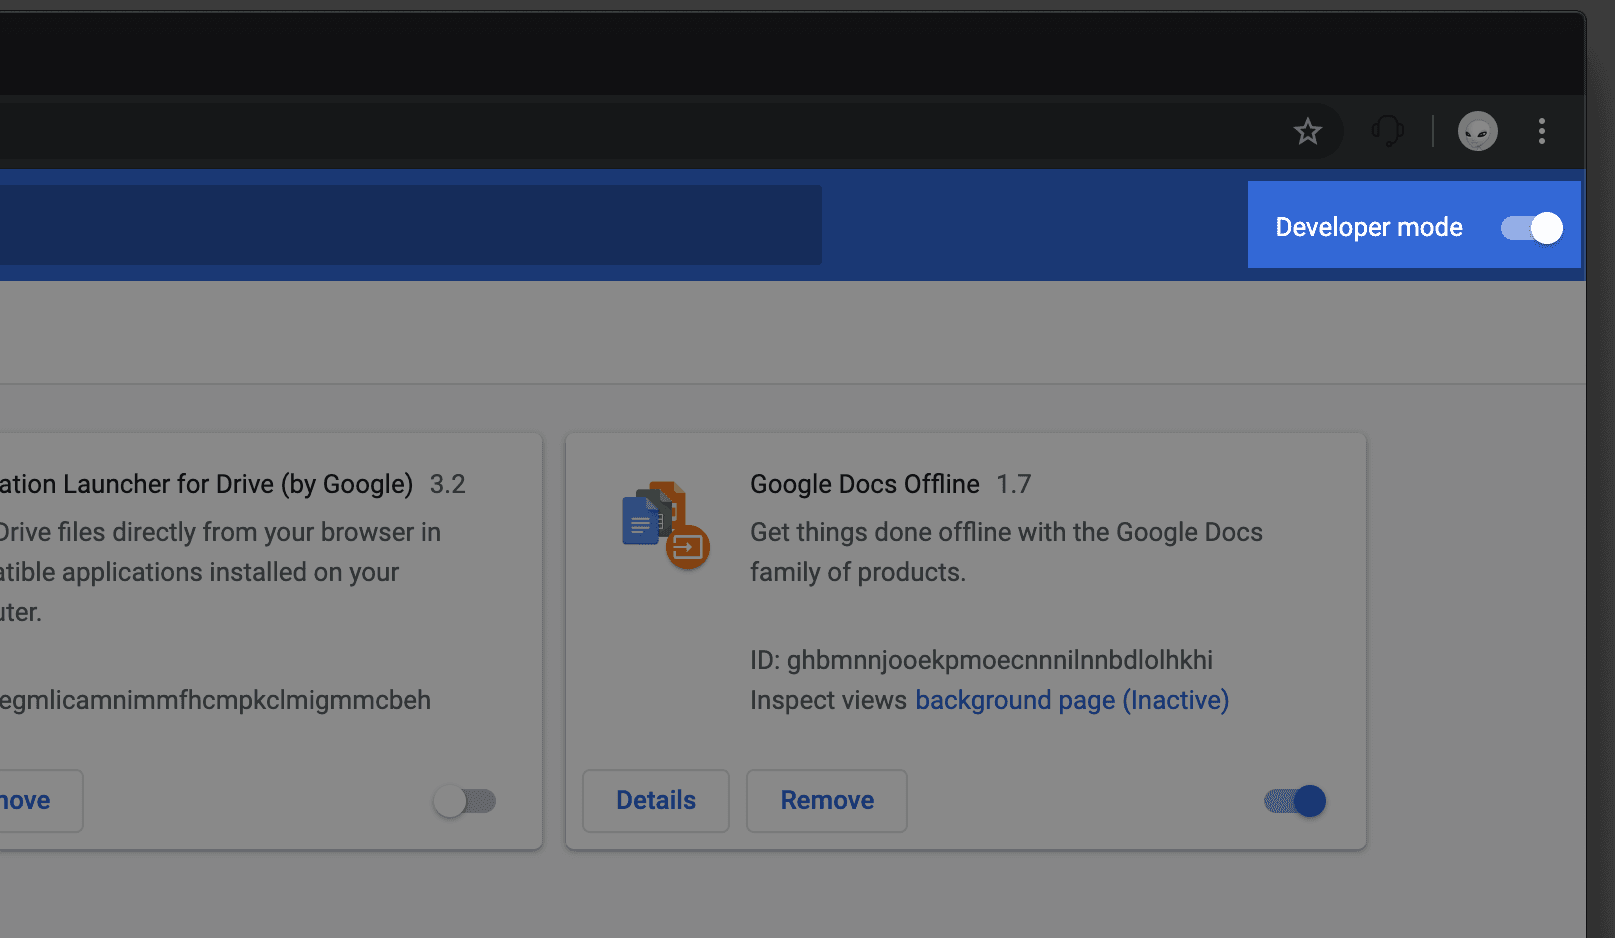
First of all, we need to enable the developer mode. In order to do that, open Chrome browser and type chrome://extensions in the search bar. Right after that, you will be able to see several cards for each extension you have installed before. What you need to do now is just to turn the switch Developer mode on. Look at the top-right corner as shown in the following image to find it.
Now, we need to add our extension my-extension to Chrome. Remember we have our distribution under the recently created dist folder, so what you need to do is look for the button Load unpacked at the top-left and select the dist folder found in the root's path of your extension. After that, you should be able to see it listed within the rest of your extensions.
TIP — Hot Reloading Once you have loaded the extension pack, vue-web-extension allows you to keep watching for new changes and hot reload the extension. To make use of this, you simply need to run npm run watch:dev.
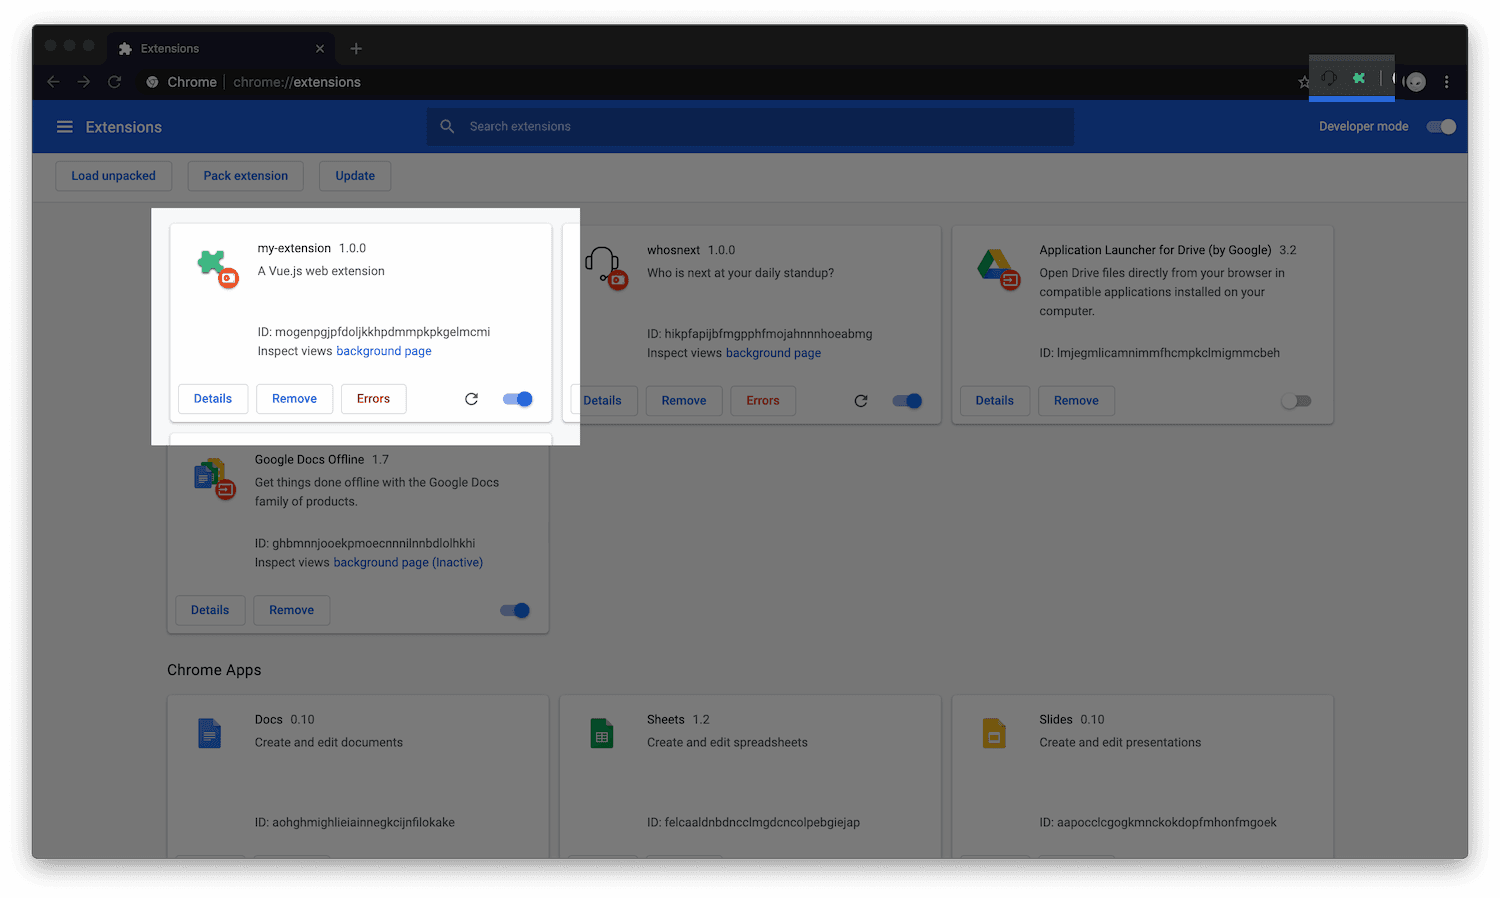
Voilá 🎩 ... Our extension is there 🎉
Go ahead, click on the extension's icon next to the search bar and see what happens...
Understanding the extension structure
Let's start by taking a look at our extension's tree:
.
├── dist
│   └── ...
├── src
│   ├── icons
│   │   └── icon_48.png
│   │   └── ...
│   └── options
│   │   └── ...
│   └── popup
│   │   └── App.vue
│   │   └── popup.html
│   │   └── popup.js
│   └── background.js
│   └── manifest.json
├── package.json
├── webpack.config.js
└── yarn.lock
What do we have?
manifest.json
The manifest.json file contains important information about your extension such as its name, permissions, icons, etc.
content script
A content script is no more than a "Js file that runs in the context of web pages." Basically, the content script will give you the possibility of interacting with web pages that you visit while using the browser. Yes, it has access to all pages you have open in the browser :scream:. Not bad 😏
To inject the content script, we need to tell the manifest.json which is the file and when to add it.
// src/manifest.json

"content_scripts": [
  {
    "matches": [
      "<all_urls>" // can use different matching patterns here
    ],
    "js": ["content.js"]
  }
]
With the option matches you can explicitly tell the browser in which pages that you visit the content.js should be injected. For more matching patterns visit: match_patterns.
TIP — Customizing the extension Suppose we want to display something in the current page once the user interacts with the popup. We need to communicate the popup with the actual web page.
In our content script we'd like to listen for events from the pop-up so let's add:
// src/content.js

// This constant is safe, it's just a string in base 64 that we will use below.
const messageToShow =
  "IyMjIyMjICAjIyMjIyMjIyAjIyMjIyMjIyAgIyMjIyMjIyMgICAgIyMjICAgICMjICAgICAjIyAjIyMjIyMjIyAjIyMjIyMjIyAgICAgIAojIyAgICAjIyAgICAjIyAgICAjIyAgICAgIyMgIyMgICAgICAgICAjIyAjIyAgICMjICAgICAjIyAjIyAgICAgICAjIyAgICAgIyMgICAgIAojIyAgICAgICAgICAjIyAgICAjIyAgICAgIyMgIyMgICAgICAgICMjICAgIyMgICMjICAgICAjIyAjIyAgICAgICAjIyAgICAgIyMgICAgIAogIyMjIyMjICAgICAjIyAgICAjIyMjIyMjIyAgIyMjIyMjICAgIyMgICAgICMjICMjICAgICAjIyAjIyMjIyMgICAjIyMjIyMjIyAgICAgIAogICAgICAjIyAgICAjIyAgICAjIyAgICMjICAgIyMgICAgICAgIyMjIyMjIyMjICAjIyAgICMjICAjIyAgICAgICAjIyAgICMjICAgICAgIAojIyAgICAjIyAgICAjIyAgICAjIyAgICAjIyAgIyMgICAgICAgIyMgICAgICMjICAgIyMgIyMgICAjIyAgICAgICAjIyAgICAjIyAgIyMjIAogIyMjIyMjICAgICAjIyAgICAjIyAgICAgIyMgIyMjIyMjIyMgIyMgICAgICMjICAgICMjIyAgICAjIyMjIyMjIyAjIyAgICAgIyMgIyMj";

chrome.runtime.onMessage.addListener(function(request, sender, sendResponse) {
  // Once we receive a message from the popup
  if (request.msg) {
    // If message has the `action` key `print_in_console`
    if (request.msg.action === "print_in_console") {
      // print awesome text on console
      console.log(`%c ${atob(messageToShow)}`, "color:#38B549;");
    } else if (request.msg.action === "change_body_color") {
      // message contains different `action` key. This time it's a `change_body_color`.
      document.body.style.background = request.msg.value;
    }
  }
});
WARNING — Telling webpack to add the content.js & Re-build the extension! In order to make our web-extension use the content.js file, we need to tell webpack to add it to the build. You need to add content: "./content.js", to the entry key under the config in your webpack.config.js. After doing that, you need to ensure that the build contains it. Stop any process for building your extension and make sure you start it again. For example re-run: npm run watch:dev. Check the new output on console and make sure you have the content.js in there. That's it!
icons & browser actions
As you may have seen, by default, my-extension has a puzzle piece (thanks to the amazing library we used). If you want to change it you must modify the manifest.json. There you will see two settings for icon_48.png and icon_128.png respectively, simply replace those images by your custom images. That icon doesn't come alone, they are also what we call browser actions. Through it, you can display a tooltip, a badge or a popup. 🤔 For example, in our default setting we are defining the icons, but also the title (try it yourself by posing the mouse over the extension's icon for a few secs) as well as the popup page (click the icon to open it). Our manifest looks something like this:
// src/manifest.json

"icons": {
  "48": "icons/icon_48.png",
  "128": "icons/icon_128.png"
},
"browser_action": {
  "default_icon": "icons/icon_48.png", // optional
  "default_title": "my-extension",
  "default_popup": "popup/popup.html"
},
Still confused? 🙄 I invite you to take a look at the official Chrome's browser action documentation.
background script
The background script, compared to the content script, it has full access to the browser API but can't access the current page as the content script can. So it will happen that you depend on both scripts if you want to do really useful things with your web extension. Also you will need to communicate them in order to pass the information around. We will see that in a minute. A practical example of a background script would be listening to clicks, for example when there is a new tab opened.
The same way you did with the content script, you'll need to explicitly tell the browser who is your background file by doing:
// src/manifest.json

"background": {
  "scripts": [
    "background.js"
  ]
},
We are not going to do anything with background.js in this example, but if you are curious about it, please check a web extension we have built in the past: whosnext vue web extension.
Messaging
As we said before, content script and background script have some limitations when it comes to communicating or getting data. They run in different contexts and they have access to different information. This forces us to communicate and pass information through messages. The same happens between the popup and the content script.
Let's check how a web extension communicates the different parts of it:
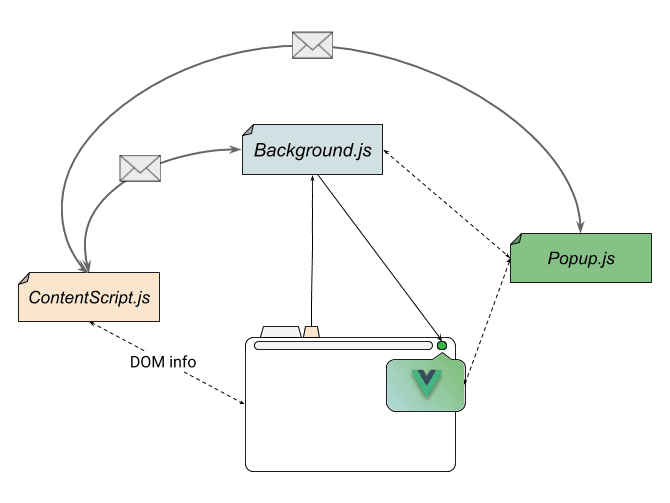
One more time, I suggest you consider the official messaging documentation if you want to understand it in more details.
In the context of this web extension, we need to send messages to our content script each time the user interacts with the popup. Why? Because we want to make changes to the current page. So we will catch those messages coming from the popup and do some crazy stuff on our page.
Let's add the following code to the popup/App.vue file:
<!-- src/popup/App.vue -->

<template>
  <div class="extension">
    <h1>Hi there! 👋 Hope you're doing great!</h1>

    <button v-on:click="writeInConsole">Do the magic!</button>

    <div>
      <h2>Want more magic?</h2>
      <span>Try them:</span>

      <div>
        <input type="radio" v-model="bodyColor" value="#f4eebc">
        <input type="radio" v-model="bodyColor" value="#bfe7c5">
        <input type="radio" v-model="bodyColor" value="#c9daf8">
      </div>

      <h4>even more?</h4>

      <div>
        <input type="radio" v-model="popupBodyColor" value="#bfe7c5">
        <input type="radio" v-model="popupBodyColor" value="#c9daf8">
        <input type="radio" v-model="popupBodyColor" value="#f4eebc">
      </div>
    </div>
  </div>
</template>
<!-- src/popup/App.vue -->

<script>
const browser = require("webextension-polyfill");

export default {
  data() {
    return {
      currentColor: "#FFF",
      currentPopupColor: "#FFF"
    };
  },

  computed: {
    bodyColor: {
      get() {
        return this.$data.currentColor;
      },
      set(val) {
        this.$data.currentColor = val;

        // Once `bodyColor` changes it sends a
        // message that content script will be listening
        browser.tabs.query({ active: true, currentWindow: true }).then(tabs => {
          browser.tabs.sendMessage(tabs[0].id, {
            msg: { action: "change_body_color", value: val }
          });
        });
      }
    },

    popupBodyColor: {
      get() {
        return this.$data.currentPopupColor;
      },
      set(val) {
        // Once `popupBodyColor` changes, we change the popup
        // body color to the new value, no need to send message,
        // it's the same context
        this.$data.currentPopupColor = val;
        document.body.style.background = val;
      }
    }
  },

  methods: {
    // method called once popup button is clicked, at that moment sends a
    // message that content script will be listening and will do some action there
    writeInConsole() {
      browser.tabs.query({ active: true, currentWindow: true }).then(tabs => {
        browser.tabs
          .sendMessage(tabs[0].id, { msg: { action: "print_in_console" } })
          .then(() => {
            alert(
              "Open the browser's console to see the magic. Need to have at least one tab in some page."
            );
          });
      });
    }
  }
};
</script>
At this point your web extension should look like this:

If you want to check how the whole project looks like, please visit web extension example on Github. You can also check a more complete web extension we made in vue at whosnext repo.
WARNING — WebExtension polyfill In this post I used only Chrome's documentation as reference because it's really comfortable reading through it and for making the tutorial simpler, however, be aware that the extension is built using webextension-polyfill which means your extension is supported in Chrome, Firefox & Opera.
Let’s build something that ships.
Streaver embeds senior product teams inside companies building AI-native software — from whiteboard to live customers.
Talk to us Engineering
What is AWS Systems Manager? Automating Patch Management on Cloud Systems
A hands-on guide to automating EC2 patching with AWS Systems Manager (SSM) and Patch Manager — from prerequisites and SSM Agent setup to patch baselines, scan associations, and compliance visibility.
 Engineering
Cybersecurity Best Practices 2026: What You Need to Know
The cybersecurity best practices that matter in 2026 — MFA and identity-first security, patch management, awareness training, Zero Trust, and tested incident response — and the AI-driven threats they defend against.