Implementing the authentication layer in Next.js
16 min read
October 20, 2022
In this post, I'm going to go over the main differences between client-side authentication and server-side authentication. To do so, I'm going to implement a very simple Next.js application using both approaches.

Have you ever built the authentication layer in a Next.js application? Do you know the difference between client-side and server-side authentication? In this post, we will build a very simple Next.js application with a thin authentication layer using both approaches!
Before jumping into the code, let's go through some basics first.
What is authentication? And authorization?
Well, you might be tempted to say they are the same; after all, they sound pretty much the same. I'm sorry, but no, they are two different processes. Let's see their difference.
Authentication is deciding whether someone (or something) is who or what they claim to be. On the other hand, authorization determines whether someone or something can access the resources they are trying to access.
Let's see the difference with a basic example: When I enter my username and password in the bank's web app, the bank authenticates me by checking that my credentials are correct according to the data they have in their database. If my credentials are right, then I'm authenticated; otherwise, I'm not, and they don't let me continue. Once authenticated, when I try to see my accounts' balances, the bank checks if the accounts I'm trying to access are mine or someone else's. If they are mine, they authorize me to manipulate them; otherwise, they don't.
I won't dive further into the authorization process or the algorithms used by the different authentication providers (in the example, the bank's app backend). Instead, I'm going to focus on how to build the authentication layer in a web application. Let's continue with a little Next.js overview; after all, it's in the title, so it has to be important, right?
Next.js
Next.js is a React full-stack framework designed to simplify many common problems like bundling, code transforming, code splitting, image optimization, SEO, etc. You can learn more about it on their official site.
One awesome Next.js feature is that we, the developers, can choose how we want to render each of our app's pages. We can choose between static file generation, client-side rendering, or server-side rendering.
Wait a moment, rendering?
In a react application, rendering is the process of transforming the react code into Html the browser can interpret. This process can be done at different times and in different places.
If the page is static, meaning its content doesn't change, the react code can be transformed into Html when the app is built and stored in a CDN (Content Delivery Network). Then when the user navigates to our app, the Html can be served very fast from the CDN. That's static file generation.
If the page is dynamic, meaning it needs some data from some API to be rendered, we could either do client-side rendering or server-side rendering.
In client-side rendering, an empty Html and the react code are sent to the user when they request a page from our app. Then, data is fetched and react code is transformed into Html on the user's device. On the other hand, when we choose server-side rendering, the data fetching is done on the server, and then the react code is transformed into Html and sent to the user together with the JSON data and the required javascript to make the page interactive.
When we do client-side rendering, we usually show a loading state while data is being fetched and swap the page's content once available. When we do server-side rendering, we don't need this initial loading state, given that the content is available from the start.
If you are interested in learning more about Next.js' different rendering strategies, feel free to check their docs.
Ok, Next.js sounds excellent, but why would you use a framework when you can do the authentication layer using just CRA (Create React Application)? Well, I'm interested in showcasing the differences between client-side authentication and server-side authentication, and for the latter, we need to do server-side rendering.
We are almost there; let's see the main differences between the two approaches before jumping into the fun part.
Client-side vs server-side authentication
The following diagram shows an overview of the authentication process on the client's side.
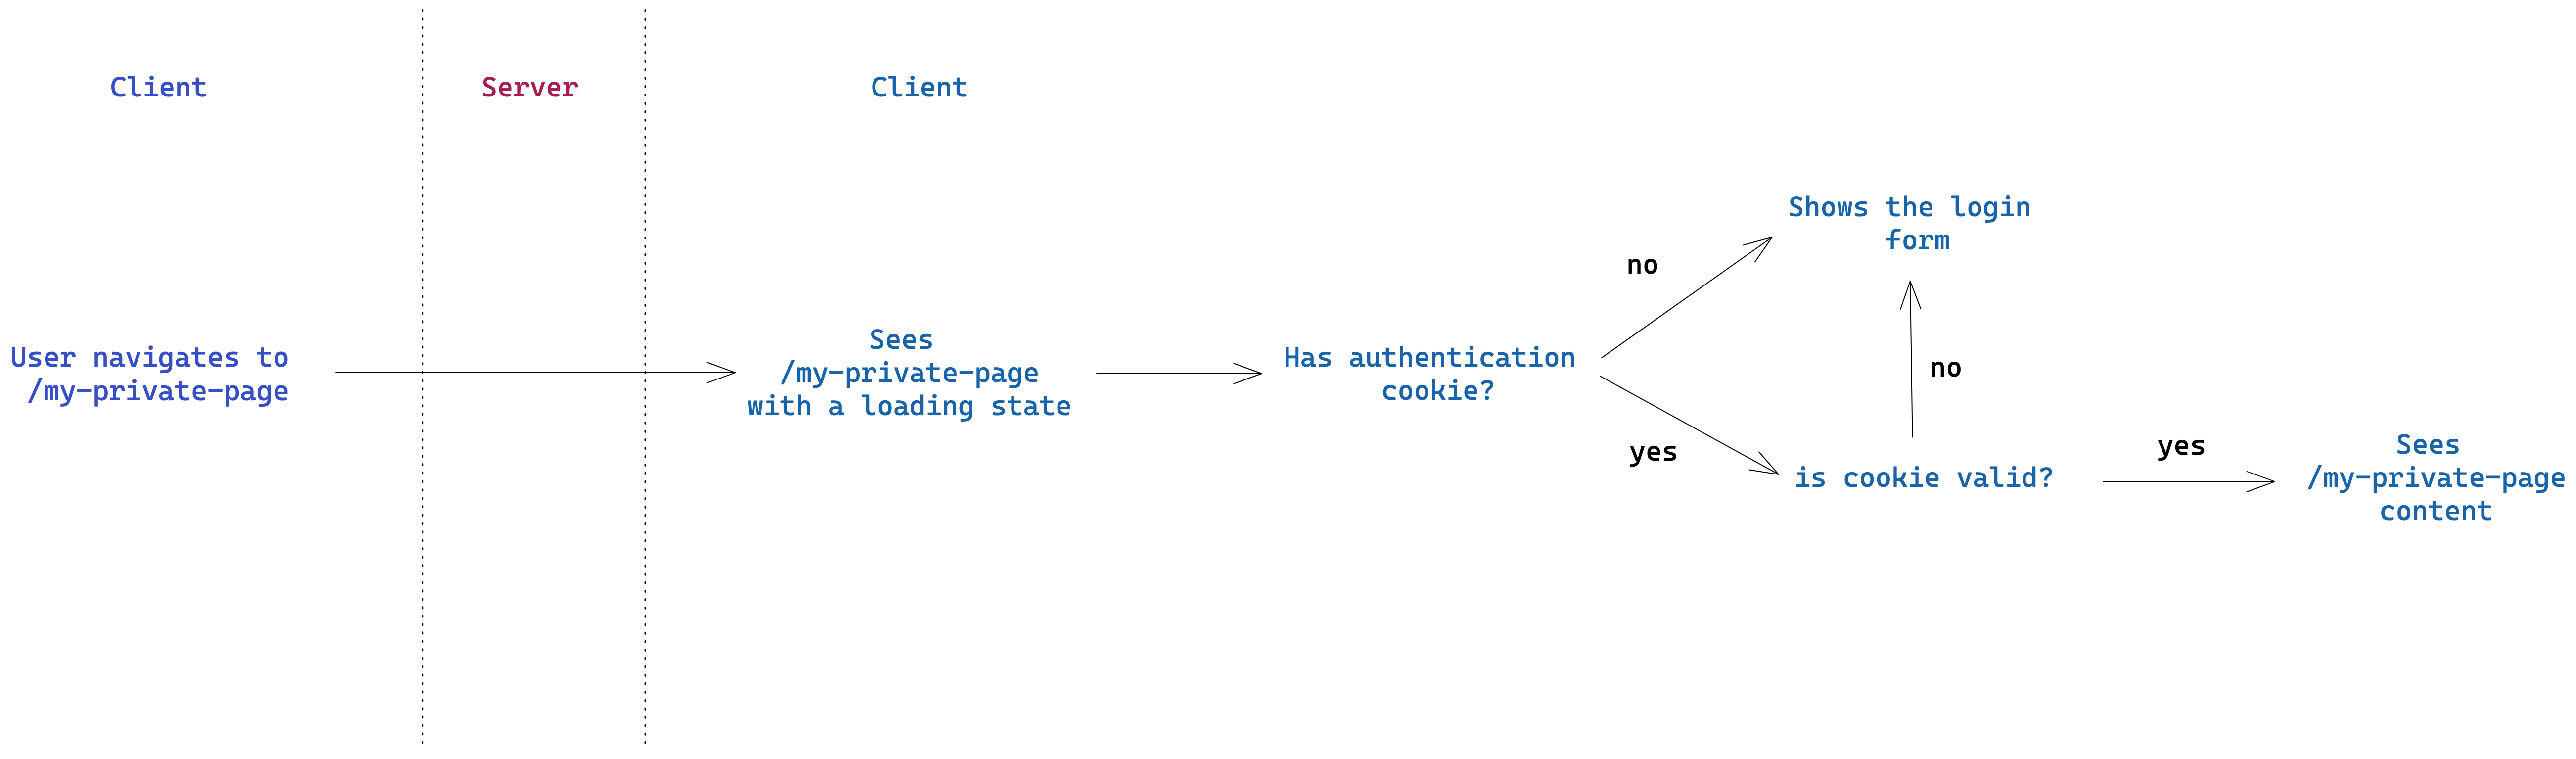
When the user requests a private page, initially, they see a loading state until the authentication process completes and the actual page's content replaces the loading state. In general, showing initial loading states is not something you want to encourage.
Why is that? Well, imagine the authentication process takes just a few milliseconds, let's say 200ms. If you show a spinner for 200ms and then replace it with the actual page's content, your users will probably experience poor UX. They will see a spinner that disappears almost immediately after its appearance and a page that flickers. You'll probably end up making decisions like: "Ok, let's delay the loading state disappearance for another 200ms" the result: A 400ms loading state when the page's content was ready way earlier. Probably the page will feel less flickery, but ask yourself, isn't that hack-ish?
In the following diagram, you can see the server-side authentication process.
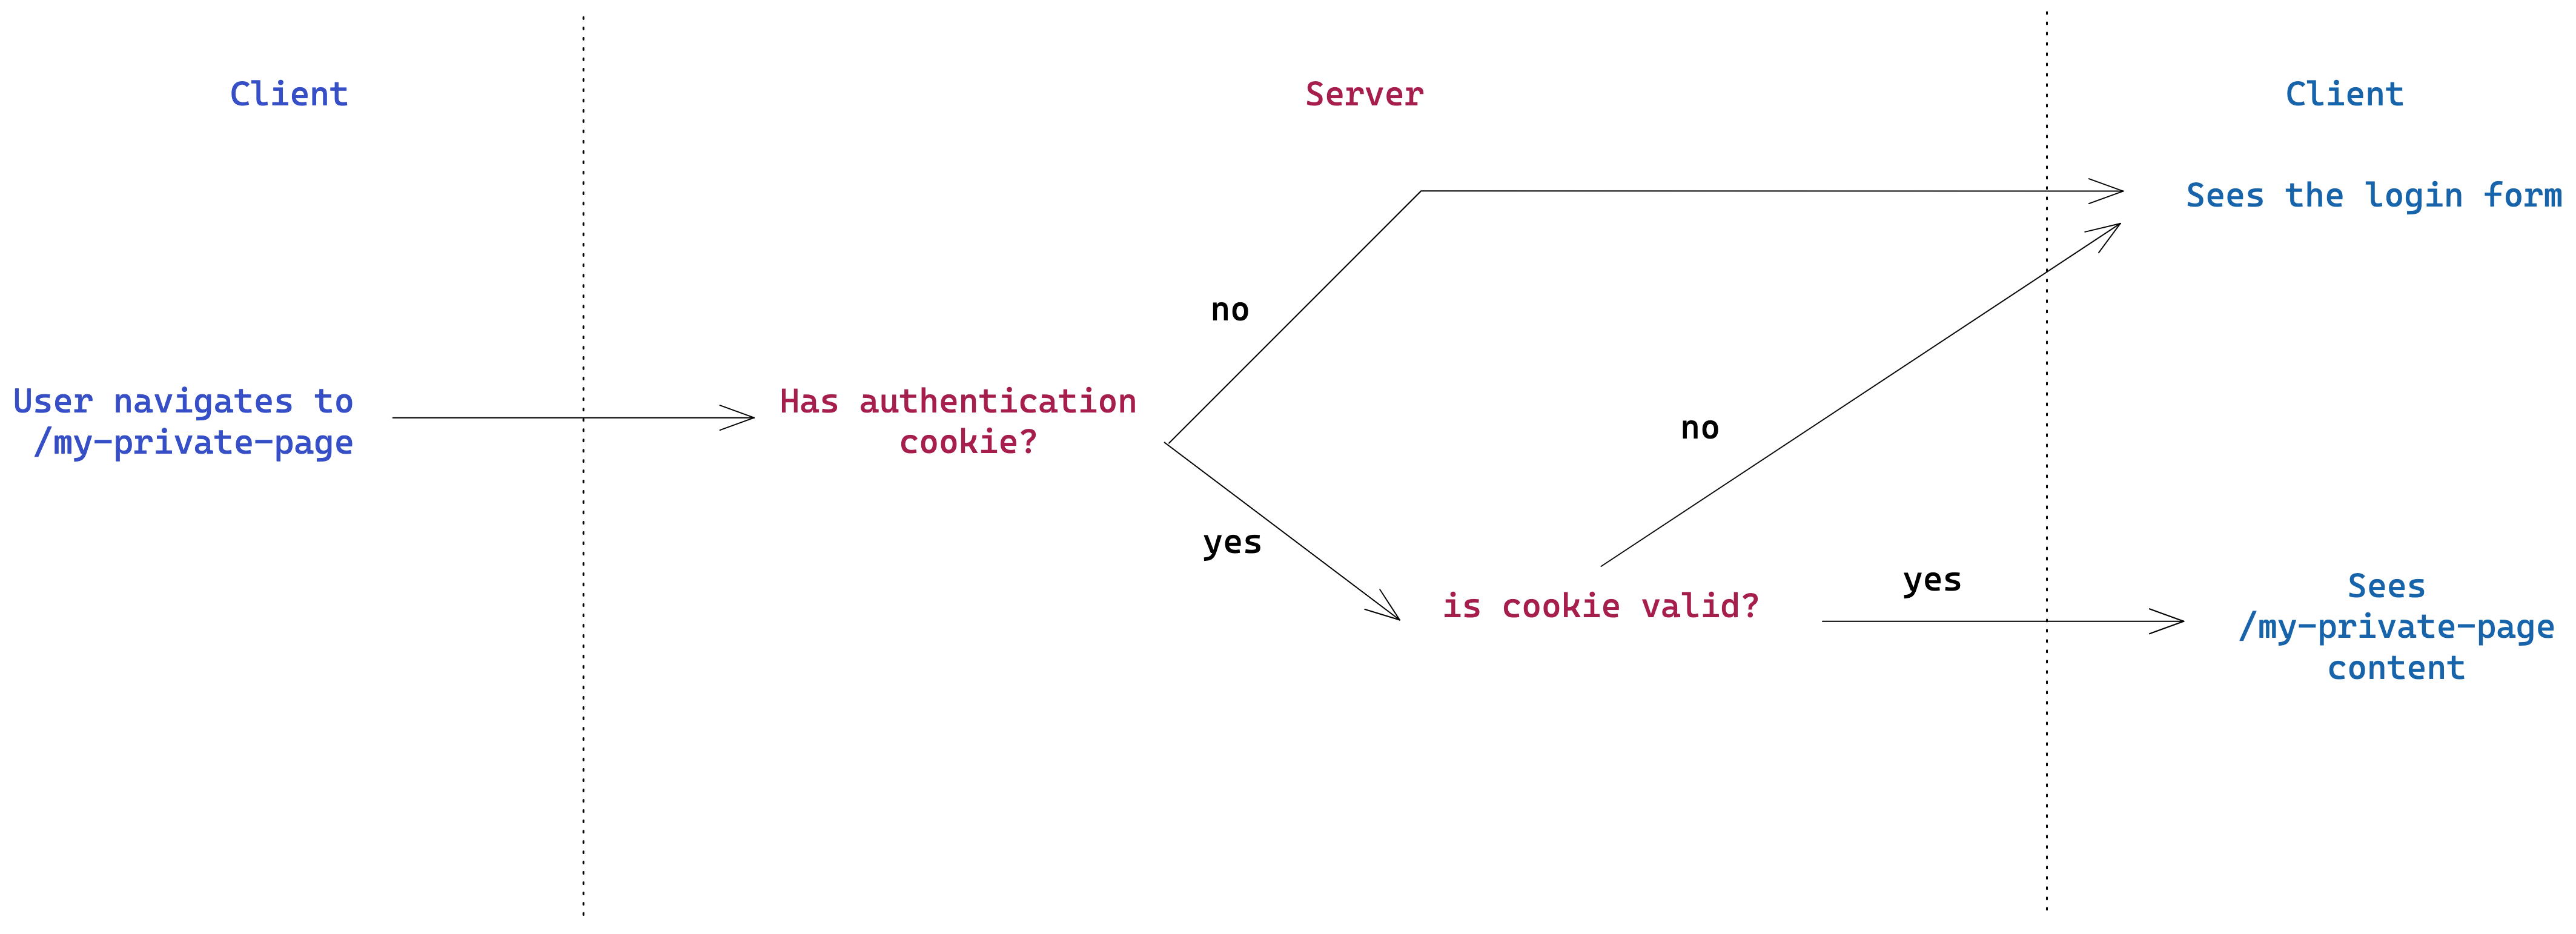
As the diagram shows, when we do server-side authentication, users don't see any loading state; either they see the private page's content or they don't, and that's decided on the server before sending any data to the client. One drawback of this approach is that if the authentication process is slow, the whole page rendering is blocked, and the user sees nothing for a while.
Without further ado, let's start coding the two approaches! Let's build an app that lets logged-in users see a private page. As I mentioned before, we'll implement two different versions, one with server-side authentication and the other one with client-side authentication.
To fake users' data, I'm going to use DummyJson's api. It's a public API that provides a lot of valuable endpoints to fake common data. In particular, we'll use the endpoint to log in with a user using their username and password.
Coding our application
Let's start by creating a Next.js application. I will use Typescript as our primary language.
After creating the app, I'll remove all the boilerplate from the Next.js template: The example API route, the content from the home page, and the base styles.
Let's start by seeing what client-side authentication looks like.
Client side authentication
Our app will have a login page letting the user log in with a basic username + password form. After the user submits the form, we'll call the authentication provider, and if the credentials are correct, it will give us an access token. We will store that token on a client-side cookie and redirect the user to a private page.
Once on the private page, as we already mentioned, we'll need to show a loading state while we check for authentication. To do so, we'll check whether the user has the authentication cookie set and whether the access token is still valid. This last step is essential; note that the cookie might be present, but the token might be expired or invalidated by the authentication provider.
I will use a third-party dependency called react-cookie to manage the client's side cookies. And wrap all the pages with their CookieProvider so we can access cookies on our pages.
Ok, now that we know what we will code, let's jump in. Let's start with the /login page.
Our login page is ready, though it's using a non-implemented login function, so let's do it.
Our login flow is complete. Let's create the /private page.
The private page looks quite simple. The juicy part seems to happen in a custom hook useAuthentication that is yet to be built.
The hook will output two flags, isAuthenticated, that as the name suggests, tells whether the user is authenticated or not, and isLoading, which will be true while the authentication process is taking place. During this process, the component LoadingState appears. Then, if the user authenticates, the content is revealed.
Note that the hook receives a redirectTo prop. The idea is to redirect the user to that page if the user hasn't authenticated. We'll redirect them to the /login page in this case.
Let's build our custom hook.
The hook is pretty simple. It reads the SID cookie we set on the login page and checks whether the access token stored in it is valid or not using the isLoggedIn function.
Finally, the isLoggedIn function.
✨ And we are done! We've built a straightforward authentication layer on the client's side! ✨
Server-side authentication
Now that we know how to do it on the client's side; let's do it on the server and see the main differences.
We won't need client-side cookies. Instead, we are going to use server-side cookies. To help us manipulate them, let's use another third-party dependency called cookie. Since the library is written in js, we'll also need its types
Our login page is almost the same; the main difference is that we won't call the authentication provider directly and set a cookie on the client's side after the login succeeds. Instead, we will use an API route (/api/login). In that route, we'll call the authentication provider and set an HTTP cookie into the response using the standard HTTP header Set-Cookie. Remember that API routes execute on the server, so we got access to the HTTP request and response objects.
The form is the same; the only thing that changes is the handleLogin action. Let's see what it looks like.
It looks almost the same though the page knows nothing about cookies. Also, note that we don't care too much about the response; if it works, we are good.
Let's see what changes are in the login function.
We can see that instead of calling the auth provider directly from the client, it now calls the API route I mentioned before. So, let's code our login API route.
The code is explained with the inline comments, though here's a walk-through.
- It checks the HTTP method to ensure it's a POST request.
- Gets the credentials from the body
- Calls the authentication provider to log in with the given credentials.
- If the login action fails, it responds with an Unauthorized status code.
- If the login action works, it sets the access token in the HTTP response via the Set-Cookie header and sends an empty response.
❗ Note the cookie options are slightly different from the ones we used for the client's side authentication. In this case, we set the httpOnly attribute to true. With it, we ensure the cookie isn't exposed to javascript code in the browser, and this is good for security reasons since we don't want malicious javascript from reading our access token!
Ok, our login flow is ready. Let's jump to the private page to see its differences.
Well, our private page is straightforward. We don't need anything but the private content; "something" will ensure that unauthenticated users won't reach this code. That something is the page's getServerSideProps function. That function will execute on the server's side before sending anything to the client's device. We can check for authentication and redirect the user if we see they haven't logged in.
Sounds fantastic. Let's see it in action.
Note that the isLoggedIn function is the same one we used in the client's side authentication example.
🎉 Tadaa! 🎉
We've built two different versions of the same app using two different authentication approaches! As you can see, there's no right or wrong approach, and both are legit options with their respective pros and cons.
That's all for today. Thanks a lot for reading, and I hope you've learned something useful!