How to test web extensions?
12 min read
April 14, 2020
It's time to test our web extensions. Here you'll find how to setup your testing environment with Jest and Puppeteer and how to test it.
You are running your web extension successfully, thousands of users are using it but development is getting harder. Each time you make changes to it you feel less comfortable and confident about not breaking any feature. In the rush to release your extension you opted to not test it, or you were not sure how to do it. Whether this is your case or you are just curious, this post pretends to help you overcome this situation by showing you how to test web extensions.
We will be testing a web extension we previously built. You can find the example web extension code and if you are curious about how to implement one, you can also check this tutorial for showing how to create a web extension in Vue.
How should I test my web extension?
When testing an application, and thus a web extension, you always want to test it at different levels to ensure with a certain confidence that the application works as expected. Testing at different levels requires you to balance your budget, time and level of confidence you need to reach and dedicate for testing. There are basically 3 levels of testing: Unit Testing, Integration Testing and System Testing. This post will cover Unit and Integration Testing of web extensions with Jest and Puppeteer. I'm not covering System testing because with current tools it's not possible to test the full experience of web extensions, however, we will try to make it as similar as if we were testing the web extension end to end.
Unit Testing
- Individual units are tested.
- Tests just a single module, component or class to validate it's correctness.
Integration Testing
- Test the sub systems and modules and their interfaces.
- They are used to test how various parts of your application interact.
- They are generally used to test important workflows within our application.
System Testing
- Test the application as a whole.
- Allow you to test user interactions with your application, running tests in either a real or a headless browser.
- Are the most expensive ones, in terms of requirements, and time to be built and run.
Now that you know a bit more about the different levels for testing an application, let's focus on testing our web extension.
Setup Testing Library
Let's grab our already working web extension example. If you want to follow along you can checkout to the tag no-tests-yet.
Now, we need to install Jest, the testing framework we will use.
After installing it, we will need to specify how we want to run our tests, so you will need to add to your package.json the following:
::: warning Our extension is built in Vue Since our extension is in vue, we also need to install the following libraries:
You can understand better why they are needed if you try running your tests without them installed. :::
Before writing the first test, I'd like to remind you that in our web extension we have been using a library to make it work across different browsers webextension-polyfill. So, if you try to run the tests the code will fail, for that reason, we'll need to mock it. We are going to use jest-webextension-mock. To install it please do:
Lastly, you will need to set it up similarly to what we did with the overall jest configuration, in this case we need to add the setupFiles key under jest like:
Now that we have our testing libraries in place it's time to test the extension. Let's go!
Unit Testing the Popup
Let's remind how the popup looks like:
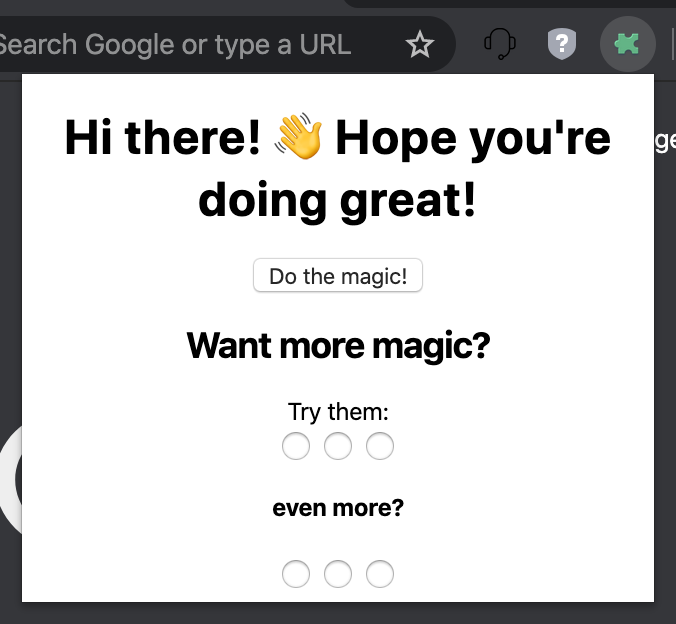
So...What should I test?
You should focus on validating that the component has all the elements it should have. For example title, subtitles, buttons, inputs, colors, and so on. Also if you have conditionals on it under some property that is being passed, you should validate it renders as expected given the different alternatives you have for it.
This might give you the clue that the test file will be conformed by a few things:
- Import of the component you want to test
- Render it, passing the properties it receives
- Look for the elements it should be displaying
Lets create a __tests__ folder under the component folder, there we will place the tests that correspond to the popup component.
Now that we have the folder, we need to add a test file for the component. Let's call it App.test.js.
Note the .test extension, this is really important to let jest know that this is a test file and use
it once we are running our test suite.
We have the file, let's now test it out.
Great! We had Unit Tested our popup component. To run them, simply execute npm test on the console, make sure you're in the root path and you will see how your tests start to run.
End2End-ish/Integration Testing with Puppeteer
The following test we are going to dive into is not a fully end to end test, however, it will introduce some techniques that are really useful and the base for testing our whole system in the future.
Here we will be doing the following things:
- Starting a real chrome browser.
- Simulating user interaction with our component.
- Validating the result of the user interaction is what we want it to be in our app.
Let's create a new folder __tests__/integration folder and inside of it, place a new file App.test.js.
Now let's install Puppeteer.
Start by creating the browser instance where we will be testing our extension. You simply need to do:
Till here, we are specifying in which conditions our chrome browser should open so we can start testing our extension.
Please note that we need to explicitly ask Puppeteer to allow our web extension, otherwise it will not be there for us to test it.
If you want to validate this is working, you can run in your console npm test, and you will see a browser instance opening, navigating to Google and closing after a couple of secs.
It's time we test our popup in the real browser. Let's make sure our popup changes the body color after clicking the different checkboxes. To achieve that, we need to first open the popup, and then do some clicks on the radio buttons, after that we should check the background color changed.
How can I achieve this?
The first thing we need to do is access our popup directly. Unfortunately, there isn't a way to click on the action controls from a chrome instance with Puppeteer, but there is a workaround for this. The popup is no other thing than an Html and it can be accessed directly from the URL, so we simply need to know the URL for it. As you might be guessing, it's popup.html, so we just simply need to know how to open an extension from its URL. To do that, there are a couple of ways but the easiest one is to create a unique ID for the extension so we can use it forever. Once we have it we can simply open: chrome-extension://${extensionId}/popup/popup.html on the browser.
::: tip Getting the extension Id I'm not going to explain it by myself, instead, I recommend taking a look to this thread at StackOverflow.
Remember to add the key and id generated to the manifest.json to make use of them.
:::
::: tip More sample tests In the web extension example repository you can find a few other examples to test for example the default background color or the amount of radio buttons by using this Puppeteer approach. :::
Please note that the tests, unlike what we did before on the unit tests, they are async. This is because Puppeteer operates asynchronously and we don't have the result of the invocated functions immediately after they have been called.
The other integration test we are missing at this point is how our popup is communicating with the content script. Unfortunately, we don't have a way to test them automatically given the implementation that we have on our extension. We are simply doing a sendMessage call to our content script which is listening to us and since the connection can't be established between them due to the context of our tests, we can't succeed on testing that a message is sent after clicking the button. In other contexts, this is easier and achievable, you will probably get inspiration from what we have done already. You can also find ways for testing the background script.
::: warning Our automated integration tests run on the compiled app! Be aware of this, each time you change your web extension and run the tests using Puppeteer, you MUST build the extension again, otherwise, you will be running the tests with the previous version of the app. If you are under development still, you can simply run:
:::
This is it. I tried to give you real working examples of how you could test your web extensions. I focused it on a particular example but I hope it helps you get ideas and kick off testing with Jest and Puppeteer on any web extension you are building.
Stay safe and build great software while in quarantine.
Hope you enjoyed and learned something new. :heart: :: Follow me :: Follow us